

- Руководство для начинающих
- Требования
- Создание приложения
- Запуск main process
- Создание веб-страницы
- Открытие веб-страницы в окне браузера
- Manage your window’s lifecycle
- Quit the app when all windows are closed (Windows & Linux)
- Open a window if none are open (macOS)
- Add functionality to your web contents
- Recap
- Package and distribute your application
Руководство для начинающих
Это руководство проведёт вас через процесс создания простого Hello World приложения в Electron, похожий на electron/electron-quick-start.
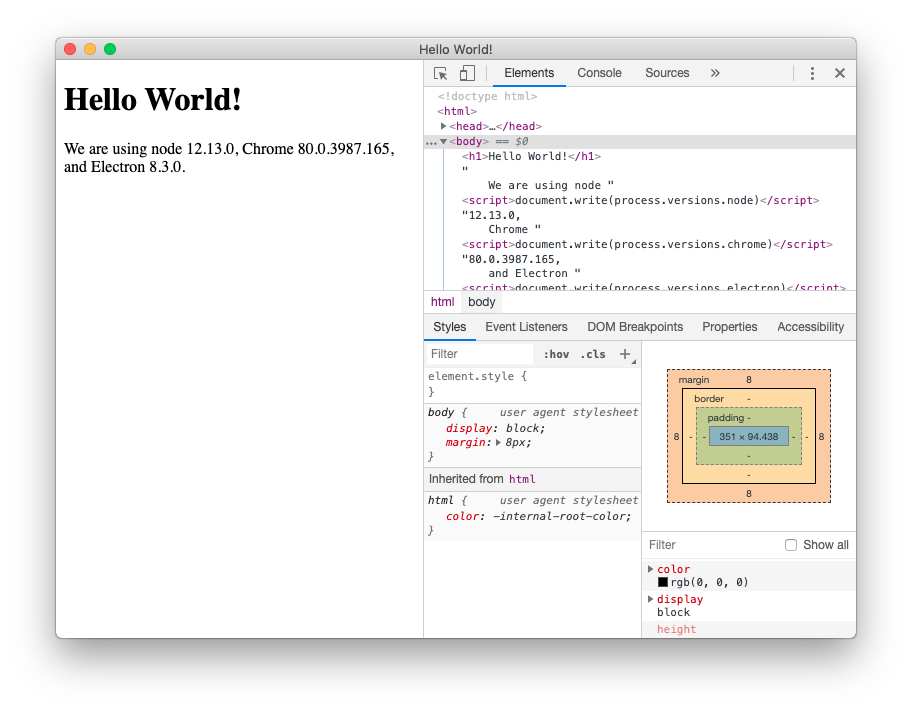
К концу этого урока ваше приложение откроет окно браузера, отображая веб-страницу с информацией о том, какие версии Chromium.js Node и Electron работают.
Требования
Чтобы использовать Electron вы должны установить Node.js. Мы рекомендуем Вам использовать последнюю доступную LTS версию.
Пожалуйста, установите Node.js с помощью предварительно собранных установщиков для вашей платформы. В противном случае могут возникнуть проблемы совместимости.
Чтобы убедится что Node.js был установлен правильно, напишите следующие команды в терминале:
Команды должны вывести версии Node.js и npm соответственно.
Note:Так как Electron встраивает Node.js в двоичный код, выполняемая версия Node.js может отличатся.
Создание приложения
Приложения Electron имеют ту же общую структуру, что и другие проекты Node.js. Начните с создания папки и инициализации пакета npm.
mkdir my-electron-app && cd my-electron-app
Команда init запросит некоторые значения для файла конфигурации. В этом руководстве стоит придерживаться следующего:
Ваш package.json файл должен выглядеть примерно так:
Далее установите пакет electron как devDependencies.
npm install —save-dev electron
Примечание: Если у вас возникли какие-либо проблемы с установкой Electron, пожалуйста, обратитесь к руководству Advanced Installation.
Наконец, чтобы стал возможен запуск приложения, добавьте команду start в разделе scripts файла package.json, как показано далее:
Эта start команда откроет ваше приложение в режиме разработчика.
Примечание: Эта команда запускает приложение из корневой папки. На этом шаге возможна ошибка, которая заключается в том, что не найдено приложение для запуска.
Запуск main process
Входной точкой для любого приложения на Electron является скрипт main. Этот скрипт управляет основным процессом, который запускается в полной среде Node.js и отвечает за управление рабочего цикла вашего приложения, отображение основного интерфейса, выполнение привилегированных операций и управление процессом визуализации (подробнее об этом позже).
В процессе выполнения, Electron будет искать этот скрипт в основном поле вашего package.json конфига, который вы сконфигурировали в процессе формирования кода приложения.
Чтобы инициализировать основной скрипт, создайте пустой файл с именем main.js в корневой папке вашего проекта.
Примечание: Если вы снова запустите скрипт запуска на этот момент, ваше приложение больше не будет выявлять никаких ошибок! Тем не менее, он не будет делать ничего, потому что мы не добавили код в main.js.
Создание веб-страницы
Прежде чем мы сможем создать окно для нашего приложения, нам нужно создать контент, который будет загружен в него. In Electron, each window displays web contents that can be loaded from either a local HTML file or a remote URL.
В этом туториале вы будете создавать первое. Создайте index.html файл в корневой папке проекта:
Замечание: Посмотрев на этот HTML-документ, можно заметить, что версии не указаны в блоке body. Мы вручную вставим их позже с помощью JavaScript.
Открытие веб-страницы в окне браузера
Now that you have a web page, load it into an application window. To do so, you’ll need two Electron modules:
Because the main process runs Node.js, you can import these as CommonJS modules at the top of your file:
Then, add a createWindow() function that loads index.html into a new BrowserWindow instance.
Next, call this createWindow() function to open your window.
In Electron, browser windows can only be created after the app module’s ready event is fired. You can wait for this event by using the app.whenReady() API. Call createWindow() after whenReady() resolves its Promise.
Note: At this point, your Electron application should successfully open a window that displays your web page!
Manage your window’s lifecycle
Although you can now open a browser window, you’ll need some additional boilerplate code to make it feel more native to each platform. Application windows behave differently on each OS, and Electron puts the responsibility on developers to implement these conventions in their app.
In general, you can use the process global’s platform attribute to run code specifically for certain operating systems.
Quit the app when all windows are closed (Windows & Linux)
On Windows and Linux, exiting all windows generally quits an application entirely.
Open a window if none are open (macOS)
Whereas Linux and Windows apps quit when they have no windows open, macOS apps generally continue running even without any windows open, and activating the app when no windows are available should open a new one.
To implement this feature, listen for the app module’s activate event, and call your existing createWindow() method if no browser windows are open.
Because windows cannot be created before the ready event, you should only listen for activate events after your app is initialized. Do this by attaching your event listener from within your existing whenReady() callback.
Note: At this point, your window controls should be fully functional!
Now, the last thing to do is print out the version numbers for Electron and its dependencies onto your web page.
Accessing this information is trivial to do in the main process through Node’s global process object. However, you can’t just edit the DOM from the main process because it has no access to the renderer’s document context. They’re in entirely different processes!
Note: If you need a more in-depth look at Electron processes, see the Process Model document.
This is where attaching a preload script to your renderer comes in handy. A preload script runs before the renderer process is loaded, and has access to both renderer globals (e.g. window and document) and a Node.js environment.
Create a new script named preload.js as such:
The above code accesses the Node.js process.versions object and runs a basic replaceText helper function to insert the version numbers into the HTML document.
To attach this script to your renderer process, pass in the path to your preload script to the webPreferences.preload option in your existing BrowserWindow constructor.
// include the Node.js ‘path’ module at the top of your file // modify your existing createWindow() function
There are two Node.js concepts that are used here:
We use a path relative to the currently executing JavaScript file so that your relative path will work in both development and packaged mode.
Add functionality to your web contents
At this point, you might be wondering how to add more functionality to your application.
Recap
The full code is available below:
// Modules to control application life and create native browser window // Create the browser window. // and load the index.html of the app. // Open the DevTools.// This method will be called when Electron has finished// initialization and is ready to create browser windows.// Некоторые интерфейсы API могут использоваться только после возникновения этого события. // On macOS it’s common to re-create a window in the app when the // dock icon is clicked and there are no other windows open. // Quit when all windows are closed, except on macOS. There, it’s common// explicitly with Cmd + Q. // In this file you can include the rest of your app’s specific main process// code. Можно также поместить их в отдельные файлы и применить к ним require.
// All the Node.js APIs are available in the preload process.// It has the same sandbox as a Chrome extension.
To summarize all the steps we’ve done:
Package and distribute your application
The fastest way to distribute your newly created app is using
Electron Forge.


